Looking back & moving forward: 2023 in review and a glimpse into 2024
Culture

Before you can jump into this content, you need to have a basic understanding of the following.
First, download and install Node.js if you haven’t already.
Create a new folder called user-management-tool and inside it create a folder called server.
Then go to the user-management-tool folder directory and run:
npm init -yIn the server folder, create a file called index.js which will be our main file for running the server.
Let’s install all the dependencies we need:
npm install express express-graphql graphql cors mongoose dotenvAlso, install nodemon as dev dependencies using:
npm install -D nodemonAfter all that, our package.json should look like this:
{
  "name": "user-managment-tool",
  "version": "1.0.0",
  "description": "",
  "main": "index.js",
  "scripts": {
    "test": "echo \"Error: no test specified\" && exit 1"
  },
  "keywords": [],
  "author": "",
  "license": "ISC",
  "dependencies": {
    "cors": "^2.8.5",
    "express": "^4.18.1",
    "express-graphql": "^0.12.0",
    "graphql": "^16.6.0",
    "mongoose": "^6.5.3"
  },
  "devDependencies": {
    "nodemon": "^2.0.19"
  }
}
Let’s change the scripts object to:
"scripts": {
    "start": "node server/index.js",
    "dev": "nodemon server/index.js"
  },
Create a .env file in the root folder and put the following code:
NODE_ENV="development"
PORT=9000
Write the following code in the index.js file:
const express = require('express');
require('dotenv').config();
const cors = require("cors");
const { graphqlHTTP } = require('express-graphql');
const schema = require('./schema/schema');
const port = process.env.PORT || 9000;
const app = express();
app.use(cors());
app.use(
    '/graphql',
    graphqlHTTP({
        schema,
        graphiql: process.env.NODE_ENV === 'development' ? true : false,
    })
);
app.listen(port, console.log(`> Server is rinning on PORT: ${port}`));
For more information about express, see this documentation.
In line 8, we set up a single route called /graphql and then pass as a parameter the graphqlHTTP middleware in which we set the schema and the graphiql flag.
Inside the server folder, we create a file called sampleData.js where we put our user data that will serve as mock data before creating the MongoDB database.
const users = [
  {
    id: "1",
    name: "John",
    password: "text123",
    email: "[email protected]",
  },
  {
    id: "2",
    name: "Mike",
    password: "welcometopassword123",
    email: "[email protected]",
  },
  {
    id: "3",
    name: "Jessica",
    password: "somepassword123",
    email: "[email protected]",
  },
  {
    id: "4",
    name: "Daniel",
    password: "hello123password",
    email: "[email protected]",
  },
];
module.exports = { users };A GraphQL query will be used to read or fetch values.
Let’s create a new folder in the server directory named schema and inside that schema folder create the schema.js file.
First, we define our userType inside schema.js:
const { GraphQLObjectType, GraphQLID, GraphQLNonNull, GraphQLString, GraphQLSchema, GraphQLList } = require("graphql");
const { users } = require("../sampleData");
const userType = new GraphQLObjectType({
    name: "User",
    fields: {
        _id: {
            type: new GraphQLNonNull(GraphQLID)
        },
        name: {
            type: new GraphQLNonNull(GraphQLString)
        },
        password: {
            type: new GraphQLNonNull(GraphQLString)
        },
        email: {
            type: new GraphQLNonNull(GraphQLString)
        },
    }
})
We defined our user type which is an object with id, name, password, and email properties.
Next in schema.js, we need to define our RootQuery object which we’ll use to retrieve/read our data.
const rootQuery = new GraphQLObjectType({
    name: "RootQueryType",
    fields: {
        getSingleUser: {
            type: new GraphQLList(userType),
            args: { id : {type: GraphQLID}},
            resolve(_, args) {
                return users.find(user => user.id === args.id)
            }
        }
    }
})
In the Fields object, we define the getSingleUser query, which will return us a single user with a particular ID inside the resolve function.
Lastly, we need to export our GraphQL schema.
module.exports = new GraphQLSchema({
    query: rootQuery,
})
You can find a more detailed tutorial on GraphQL in this documentation.
MongoDB is a document-oriented NoSQL database used for high-volume data storage.
Instead of tables and rows as in traditional relational databases, MongoDB uses collections and documents.
Documents consist of key-value pairs, which are the basic unit of data in MongoDB.
For more information, see this documentation.
We’ll be using the MongoDB Atlas service to create our database.
MongoDB Atlas is a Cloud-hosted MongoDB service on AWS, Azure, and Google Cloud. So, it’s easy to create our database without downloading or installing anything on your computer.
Click here to visit the MongoDB Atlas website.
1) After you create your Atlas account, you’ll see this screen. We choose to use it to create a new application. The type of application is Content Management, and the preferred language is JavaScript.

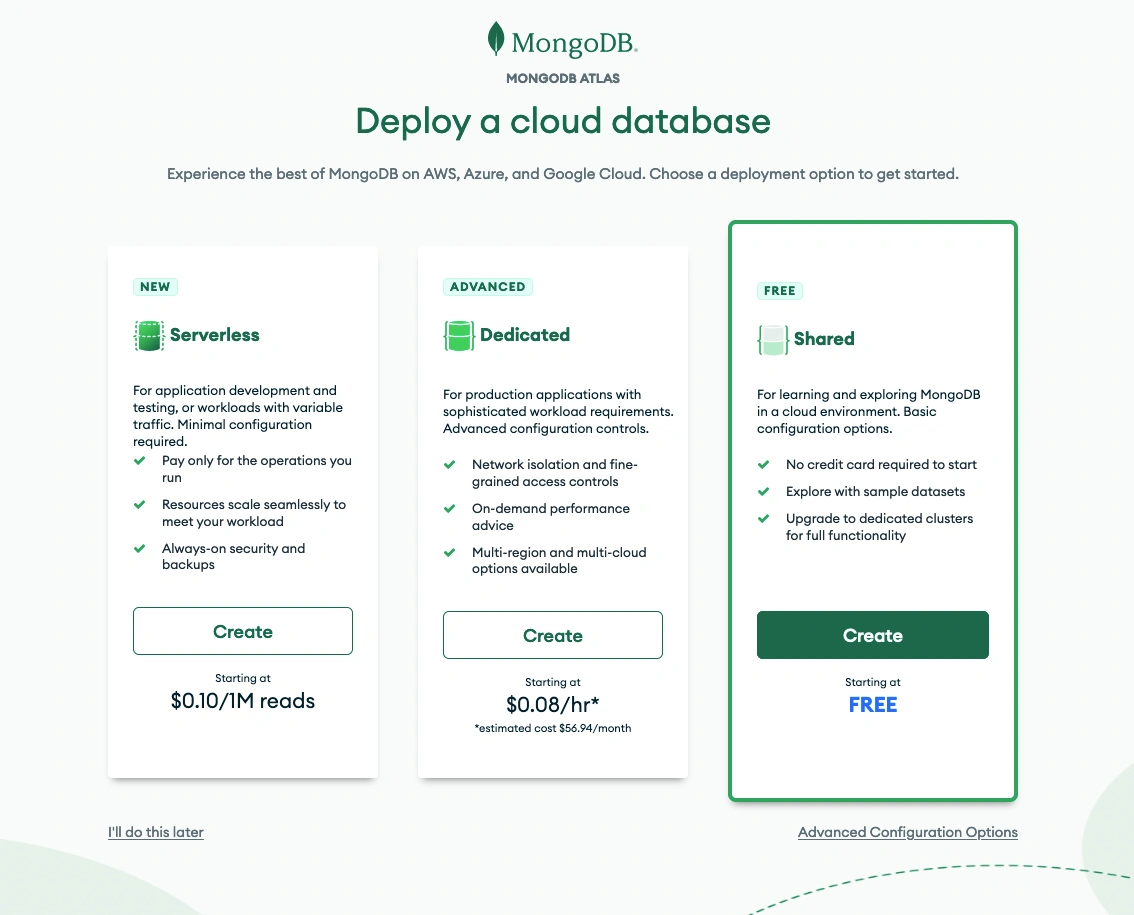
2) We’ll use a free Shared cloud database and click “Create”.
3) We’ll leave everything on this screen by default and then click “Create Cluster”.

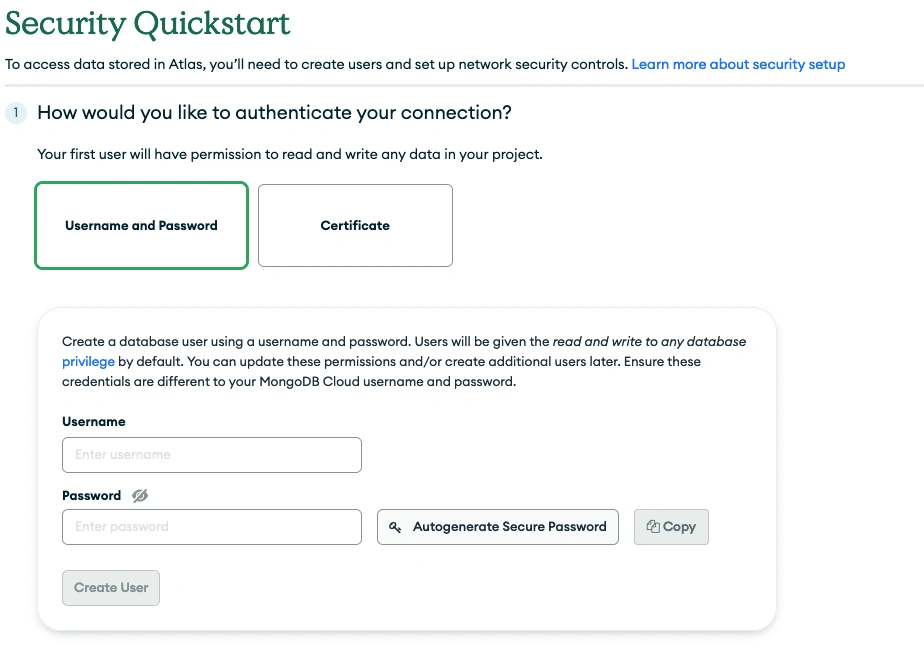
4) On this screen, you’ll need to create a user. Just enter the username and password you want and click “Create User”.
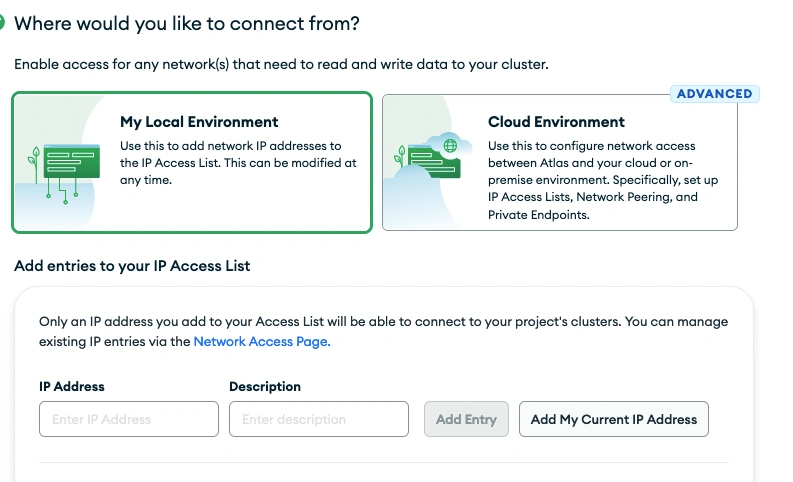
5) On this screen, select “My Local Environment” and click “Add my Current IP Address” and then click on “Finish and Close”.
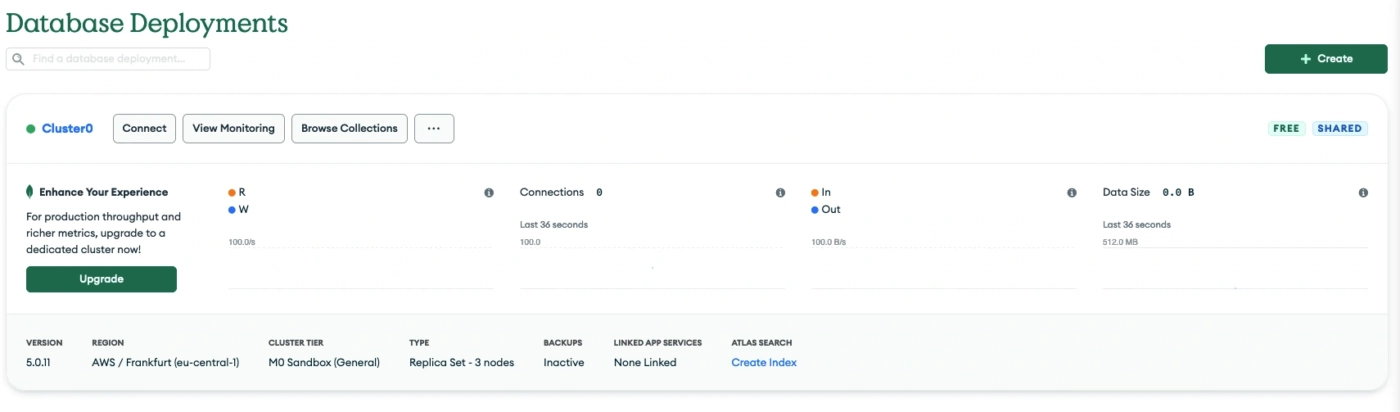
6) After that your cluster will be created. You may have to wait a couple of minutes for it to be created.
Next, click on “Browse Collection” to create our database.
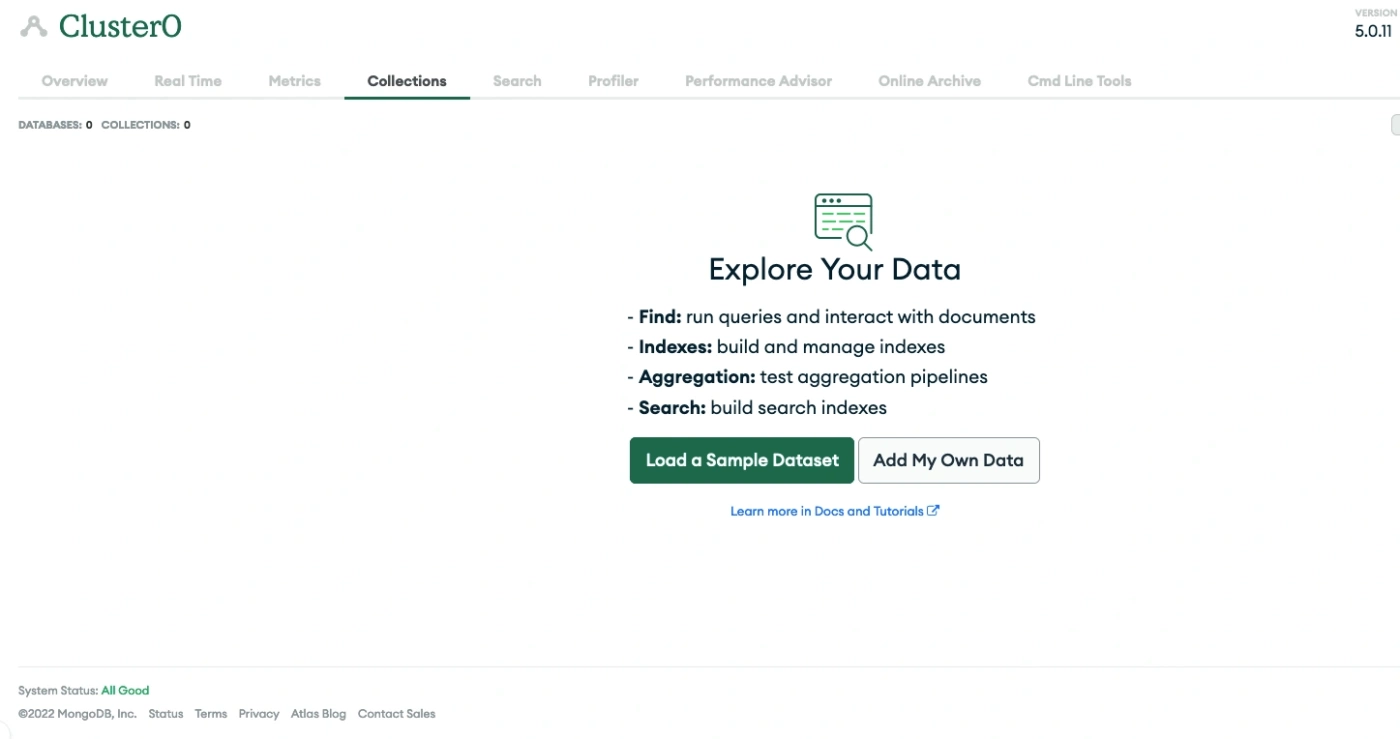
7) In the collections, select “Add My Own Data”.
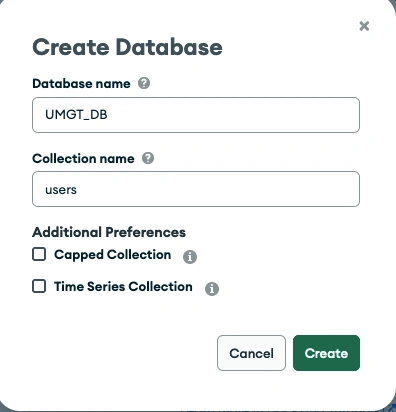
8) Enter your database name and collection name. Click “Create”.
9) On the left side of the screen, under “Deployment”, click “Database”.
After that, click “Connect” and then “Connect your application”.

10) In the second step, copy the connection string that we’ll use to connect MongoDB with our express server.
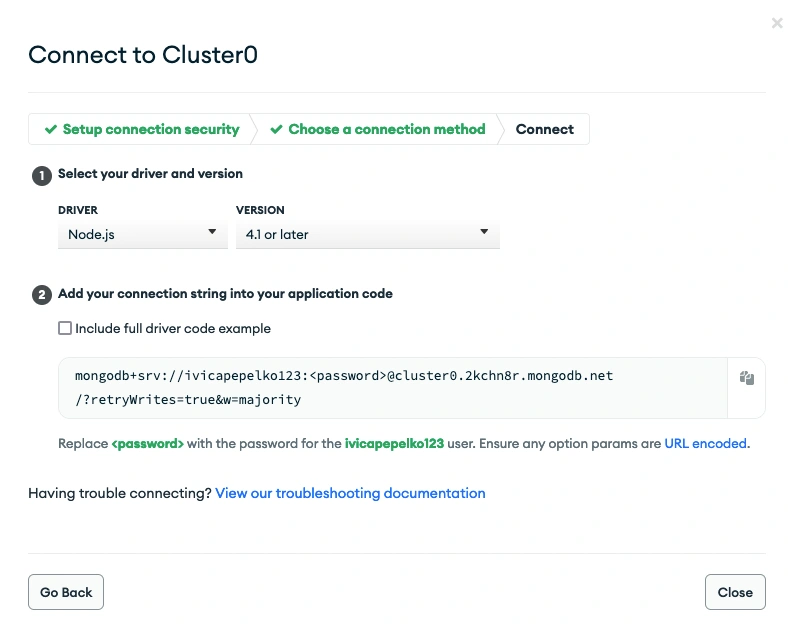
Go to our .env file inside Code Editor and put the connection string inside.
MONGO_URI=copy connection string here// Example
MONGO_URI=mongodb+srv://ivicapepelko123:<password>@cluster0.zq0fc.mongodb.net/UMGT_DB?retryWrites=true&w=majorityThe <password> needs to be changed to the password we created in Step 4, when we created a user.
You can see that next to <password> is the username we entered earlier.
@cluster0.zq0fc.mongodb.net/UMGT_DBAfter the mongodb.net/ we need to specify the database name we created in Step 8, otherwise the default database called “test” will be used.
Inside the server folder, create an additional folder called config. In this folder, create the db.js file, which will be the entry point for connecting our database.
Enter the following code inside:
const mongoose = require("mongoose");
const connectDB = async () => {
  try {
    const conn = await mongoose.connect(process.env.MONGO_URI);
    console.log(`MongoDB Connected: ${conn.connection.host}`);
  } catch (error) {
    console.log(error);
    process.exit(1);
  }
};
module.exports = connectDB;
We’re using the mongoose npm package, and just use mongoose. connect and put the URI we created with MongoDB Atlas.
Inside index.js, we import our connectDB function and initialize it.
const connectDB = require("./config/db");
connectDB();
const express = require("express");
require("dotenv").config();
const cors = require("cors");
const { graphqlHTTP } = require("express-graphql");
const connectDB = require("./config/db");
const schema = require("./schema/schema");
const port = process.env.PORT || 9000;
connectDB();
const app = express();
app.use(cors());
app.use(
"/graphql",
graphqlHTTP({
schema,
graphiql: process.env.NODE_ENV === "development" ? true : false,
})
);
app.listen(port, console.log(`> Server is rinning on PORT: ${port}`));Our index.js file should look like this now, as you can see on lines 5 & 8.
Inside our server folder, we are gonna create a models folder and inside we gonna create userModel.js
const moongose = require("mongoose");
const userSchema = moongose.Schema(
  {
    name: {
      type: String,
      required: true,
    },
    password: {
      type: String,
      required: true,
    },
    email: {
      type: String,
      required: true,
    },
  },
  {
    timestamps: false,
  }
);
module.exports = moongose.model("User", userSchema);
Here we just created our user schema which has name, password & email properties.
Inside our schema.js we need to import our userSchema that we created inside userModel.js
const User = require("../models/userModel")
const rootQuery = new GraphQLObjectType({
  name: "RootQueryType",
  fields: {
    getSingleUser: {
      type: userType,
      args: {
        id: {
          type: new GraphQLNonNull(GraphQLID),
        },
      },
      resolve: async (_, args) => {
        try {
          return await User.findById(args.id);
        } catch (error) {
          throw new Error(error.message);
        }
      },
    },
  },
});
Inside our rootQuery object we should change the resolve function inside getSingleUser query to match with return await User.findById(args.id);
findById is a mongoose function where we find a user by id and return it.
Let’s add another function inside rootQuery called getUsers.
 getUsers: {
      type: new GraphQLList(userType),
      resolve: async () => {
        try {
          return await User.find();
        } catch (error) {
          throw new Error(error.message);
        }
      },
    },
const rootQuery = new GraphQLObjectType({
name: "RootQueryType",
fields: {
getSingleUser: {
type: userType,
args: {
id: {
type: new GraphQLNonNull(GraphQLID),
},
},
resolve: async (_, args) => {
try {
return await User.findById(args.id);
} catch (error) {
throw new Error(error.message);
}
},
},
getUsers: {
type: new GraphQLList(userType),
resolve: async () => {
try {
return await User.find();
} catch (error) {
throw new Error(error.message);
}
},
},
},
});After all that our rootQuery object should look like this with getUsers & getSingleUser queries.
In GraphQL, you insert, update or delete data with mutations.
A Mutation is a GraphQL Operation that allows you to insert new data or modify the existing data on the server side.
You can think of GraphQL Mutations as the equivalent of POST, PUT, PATCH and DELETE requests in REST.
Just below our rootQuery object in schema.js, we gonna create a rootMutation object.
const rootMutation = new GraphQLObjectType({
    name: "Mutation",
    fields: {
        createUser: {
            type: userType,
            args: {
                name: {
                    type: new GraphQLNonNull(GraphQLString)
                },
                password: {
                    type: new GraphQLNonNull(GraphQLString)
                },
                email: {
                    type: new GraphQLNonNull(GraphQLString)
                },
            },
            resolve: async (_, args) => {
                try {
                    return await User.create({
                        name: args.name,
                        password: args.password,
                        email: args.email,
                    })
                } catch (error) {
                    throw new Error(error.message)
                }
            }
        },
    }
})
Just like we did with rootQuery we have the same properties, here we created a createUser mutation that accepts name, password & email as our payload data which we will send from the react app.
Inside the resolve function we have User.create() which created a new user inside our database.
We have our createUser mutation, now let’s add updateUser & deleteUser mutation
const rootMutation = new GraphQLObjectType({
    name: "Mutation",
    fields: {
        createUser: {
            type: userType,
            args: {
                name: {
                    type: new GraphQLNonNull(GraphQLString)
                },
                password: {
                    type: new GraphQLNonNull(GraphQLString)
                },
                email: {
                    type: new GraphQLNonNull(GraphQLString)
                },
            },
            resolve: async (_, args) => {
                try {
                    return await User.create({
                        name: args.name,
                        password: args.password,
                        email: args.email,
                    })
                } catch (error) {
                    throw new Error(error.message)
                }
            }
        },
        updateUser: {
            type: userType,
            args: {
                id: {
                    type: new GraphQLNonNull(GraphQLID)
                },
                name: {
                    type: new GraphQLNonNull(GraphQLString)
                },
                password: {
                    type: new GraphQLNonNull(GraphQLString)
                },
                email: {
                    type: new GraphQLNonNull(GraphQLString)
                },
            },
            resolve: async (_, args) => {
                const dataToUpdate = {
                    name: args.name,
                    password: args.password,
                    email: args.email
                }
                try {
                    return await User.findByIdAndUpdate(args.id, dataToUpdate, {
                        new: true
                    })
                } catch (error) {
                    throw new Error(error.message)
                }
            }
        },
        deleteUser: {
            type: GraphQLString,
            args: {
                id: {
                    type: new GraphQLNonNull(GraphQLID)
                },
            },
            resolve: async (_, args) => {
                try {
                    await User.findById(args.id).deleteOne()
                    return args.id
                } catch (error) {
                    throw new Error(error.message)
                }
            }
        },
    }
})
For more information about all functions when deleting, updating, and reading in mongoose, see this documentation.
Finally, let’s not forget to add rootMutation to our GraphQLSchema.
module.exports = new GraphQLSchema({
    query: rootQuery,
    mutation: rootMutation
})
const { GraphQLObjectType, GraphQLID, GraphQLNonNull, GraphQLString, GraphQLSchema } = require("graphql");
const User = require("../models/userModel");
const userType = new GraphQLObjectType({
name: "User",
fields: {
id: {
type: new GraphQLNonNull(GraphQLID),
},
name: {
type: new GraphQLNonNull(GraphQLString),
},
password: {
type: new GraphQLNonNull(GraphQLString),
},
email: {
type: new GraphQLNonNull(GraphQLString),
},
},
});
const rootQuery = new GraphQLObjectType({
name: "RootQueryType",
fields: {
getSingleUser: {
type: new GraphQLList(userType),
args: {
id: {
type: new GraphQLNonNull(GraphQLID),
},
},
resolve: async (_, args) => {
try {
return await User.findById(args.id);
} catch (error) {
throw new Error(error.message);
}
},
},
getUsers: {
type: new GraphQLList(userType),
resolve: async () => {
try {
return await User.find();
} catch (error) {
throw new Error(error.message);
}
},
},
},
});
const rootMutation = new GraphQLObjectType({
name: "Mutation",
fields: {
createUser: {
type: userType,
args: {
name: {
type: new GraphQLNonNull(GraphQLString)
},
password: {
type: new GraphQLNonNull(GraphQLString)
},
email: {
type: new GraphQLNonNull(GraphQLString)
},
},
resolve: async (_, args) => {
try {
return await User.create({
name: args.name,
password: args.password,
email: args.email,
})
} catch (error) {
throw new Error(error.message)
}
}
},
updateUser: {
type: userType,
args: {
id: {
type: new GraphQLNonNull(GraphQLID)
},
name: {
type: new GraphQLNonNull(GraphQLString)
},
password: {
type: new GraphQLNonNull(GraphQLString)
},
email: {
type: new GraphQLNonNull(GraphQLString)
},
},
resolve: async (_, args) => {
const dataToUpdate = {
name: args.name,
password: args.password,
email: args.email
}
try {
return await User.findByIdAndUpdate(args.id, dataToUpdate, {
new: true
})
} catch (error) {
throw new Error(error.message)
}
}
},
deleteUser: {
type: GraphQLString,
args: {
id: {
type: new GraphQLNonNull(GraphQLID)
},
},
resolve: async (_, args) => {
try {
await User.findById(args.id).deleteOne()
return args.id
} catch (error) {
throw new Error(error.message)
}
}
},
}
})
module.exports = new GraphQLSchema({
query: rootQuery,
mutation: rootMutation
})Above you can see how our schema.js file looks like after the changes.
We created a simple React app that you can download here.
After you download it to the user-management-tool directory and run the project, you should see the following:

In our client/src/App.js, we need to import apollo-client and then initialize it.
import { ApolloProvider, ApolloClient, InMemoryCache } from "@apollo/client";
const client = new ApolloClient({
  uri: "http://localhost:9000/graphql",
  cache: new InMemoryCache(),
})
const App = () => {
  return (
    <ApolloProvider client={client}>
      <Router>
        <div className="App">
          <Navbar />
          <Switch>
            <Route exact path="/" component={Home} />
            <Route exact path="/users/add" component={AddUser} />
            <Route exact path="/users/edit/:id" component={EditUser} />
          </Switch>
        </div>
      </Router>
    </ApolloProvider>
  );
};
export default App;
After we initialize apollo-client, we need to wrap our project with
<ApolloProvider client={client}></ApolloProvider> and pass client variable as property.
Inside the new ApolloClient, we have to put URI where we started our server, which in this case, is on port:9000.
import React from "react";
import "../node_modules/bootstrap/dist/css/bootstrap.css";
import Home from "./components/pages/Home";
import Navbar from "./components/layout/Navbar";
import { BrowserRouter as Router, Route, Switch } from "react-router-dom";
import AddUser from "./components/users/AddUser";
import EditUser from "./components/users/EditUser";
import { ApolloProvider, ApolloClient, InMemoryCache } from "@apollo/client";
const client = new ApolloClient({
  uri: "http://localhost:9000/graphql",
  cache: new InMemoryCache(),
});
const App = () => {
  return (
    <ApolloProvider client={client}>
      <Router>
        <div className="App">
          <Navbar />
          <Switch>
            <Route exact path="/" component={Home} />
            <Route exact path="/users/add" component={AddUser} />
            <Route exact path="/users/edit/:id" component={EditUser} />
          </Switch>
        </div>
      </Router>
    </ApolloProvider>
  );
};
export default App;
Our App.js should look like this after adding apollo-client.
Inside components/pages/home.js, we will add:
import { gql, useQuery } from "@apollo/client";
const GET_USERS = gql`
  query {
    getUsers {
      _id
      name
      password
      email
    }
  }
`;
const Home = () => {
  const { loading, error, data } = useQuery(GET_USERS);

  useEffect(() => {
    if (data) {
      setUser(data.getUsers);
    }
  }, [data]);

  if (loading) return <p>Loading...</p>;
  if (error) return <p>Something Went Wrong</p>;

}
EDIT: Don’t overwrite this code with the current one inside Home.js
In GET_USERS variable, we call the getUsers query which we have in our schema.js that returns all users in the database.
On line 15 we use useQuery to fetch data which is then stored inside the data variable.
In our src folder, let’s create the mutations folder and inside create userMutations.js
First, we‘ll create deleteUser mutations.
import { gql } from "@apollo/client";
const DELETE_USER = gql`
  mutation deleteUser($id: ID!) {
    deleteUser(id: $id)
  }
`;
export { DELETE_USER };
In our Home.js file we add the following code:
import { gql, useQuery, useMutation } from "@apollo/client";
import { DELETE_USER } from "../../mutations/userMutations";
const Home = () => {
  const [deleteUser] = useMutation(DELETE_USER);

  const removeUser = (id) => {
    deleteUser({
      variables: { id },
    });

    const filterUsers = users.filter((user) => user._id !== id);
    setUser(filterUsers);
  };

    return (
    <div className="container">
      <div className="py-4">
        <h1>Home Page</h1>
        <table class="table border shadow">
          <thead class="thead-dark">
            <tr>
              <th scope="col">Id</th>
              <th scope="col">Name</th>
              <th scope="col">Password</th>
              <th scope="col">Email</th>
              <th>Action</th>
            </tr>
          </thead>
          <tbody>
            {users.map((user) => (
              <tr>
                <th scope="row">{user._id}</th>
                <td>{user.name}</td>
                <td>{user.password}</td>
                <td>{user.email}</td>
                <td>
                  <Link class="btn btn-outline-primary mr-2" to={`/users/edit/${user._id}`}>
                    Edit
                  </Link>
                  <Link class="btn btn-danger" onClick={() => removeUser(user._id)}>
                    Delete
                  </Link>
                </td>
              </tr>
            ))}
          </tbody>
        </table>
      </div>
    </div>
  );
}
We import the useMutation hook and import the DELETE_USER mutation from our userMutation.js file.
Create a new function called removeUsers which calls deleteUser mutation. Then, we just filter that particular user from our user’s state.
On line 41 we call the removeUsers function and pass its user id as an argument.
After adding getUsers querie & deleteUsers mutation our Home.js file should look like this:
import React, { useState, useEffect } from "react";
import { Link } from "react-router-dom";
import "./style.css";
import { gql, useQuery, useMutation } from "@apollo/client";
import { DELETE_USER } from "../../mutations/userMutations";
const GET_USERS = gql`
  query {
    getUsers {
      _id
      name
      password
      email
    }
  }
`;
const Home = () => {
  const { loading, error, data } = useQuery(GET_USERS);
  const [deleteUser] = useMutation(DELETE_USER);
  const [users, setUser] = useState([]);

  useEffect(() => {
    if (data) {
      setUser(data.getUsers);
    }
  }, [data]);

  if (loading) return <p>Loading...</p>;
  if (error) return <p>Something Went Wrong</p>;

  const removeUser = (id) => {
    deleteUser({
      variables: { id },
    });
    const filterUsers = users.filter((user) => user._id !== id);
    setUser(filterUsers);
  };

  return (
    <div className="container">
      <div className="py-4">
        <h1>Home Page</h1>
        <table class="table border shadow">
          <thead class="thead-dark">
            <tr>
              <th scope="col">Id</th>
              <th scope="col">Name</th>
              <th scope="col">Password</th>
              <th scope="col">Email</th>
              <th>Action</th>
            </tr>
          </thead>
          <tbody>
            {users.map((user) => (
              <tr>
                <th scope="row">{user._id}</th>
                <td>{user.name}</td>
                <td>{user.password}</td>
                <td>{user.email}</td>
                <td>
                  <Link class="btn btn-outline-primary mr-2" to={`/users/edit/${user._id}`}>
                    Edit
                  </Link>
                  <Link class="btn btn-danger" onClick={() => removeUser(user._id)}>
                    Delete
                  </Link>
                </td>
              </tr>
            ))}
          </tbody>
        </table>
      </div>
    </div>
  );
};
export default Home;
Let’s add createUser mutation.
In the userMutations.js file lets add the following code:
const CREATE_USER = gql`
  mutation createUser($name: String!, $password: String!, $email: String!) {
    createUser(name: $name, password: $password, email: $email) {
      _id
      name
      password
      email
    }
  }
`;
export { DELETE_USER, CREATE_USER };
In our src/components/users/AddUser.js file add the following code:
import { useMutation } from "@apollo/client";
import { CREATE_USER } from "../../mutations/userMutations";
const AddUser = () => {
  const [createUser] = useMutation(CREATE_USER);
  const addUser = (e) => {
    e.preventDefault();

    if (name.length && password.length && email.length) {
      createUser({
        variables: {
          name,
          password,
          email,
        },
      });

      setUser({
        name: "",
        password: "",
        email: "",
      });
    }
  };

  return (
    <div className="container">
      <div className="w-75 mx-auto shadow p-5">
        <h2 className="text-center mb-4">Add A User</h2>
        <form>
          <div className="form-group">
            <input type="text" className="form-control form-control-lg" placeholder="Enter Your Name" name="name" value={name} onChange={(e) => onInputChange(e)} />
          </div>
          <div className="form-group">
            <input type="text" className="form-control form-control-lg" placeholder="Enter Your Password" name="password" value={password} onChange={(e) => onInputChange(e)} />
          </div>
          <div className="form-group">
            <input type="email" className="form-control form-control-lg" placeholder="Enter Your E-mail Address" name="email" value={email} onChange={(e) => onInputChange(e)} />
          </div>
          <button className="btn btn-primary btn-block" onClick={(e) => addUser(e)}>
            Add User
          </button>
        </form>
      </div>
    </div>
  );
};
Same logic as we did deleteUser mutations.
This is AddUser.js after adding createUser mutation.
import React, { useState } from "react";
import { useMutation } from "@apollo/client";
import { CREATE_USER } from "../../mutations/userMutations";
const AddUser = () => {
  const [createUser] = useMutation(CREATE_USER);
  const [user, setUser] = useState({
    name: "",
    password: "",
    email: "",
  });

  const { name, password, email } = user;

  const onInputChange = (e) => {
    setUser({ ...user, [e.target.name]: e.target.value });
  };

  const addUser = (e) => {
    e.preventDefault();
    if (name.length && password.length && email.length) {
      createUser({
        variables: {
          name,
          password,
          email,
        },
      });
      setUser({
        name: "",
        password: "",
        email: "",
      });
    }
  };

  return (
    <div className="container">
      <div className="w-75 mx-auto shadow p-5">
        <h2 className="text-center mb-4">Add A User</h2>
        <form>
          <div className="form-group">
            <input type="text" className="form-control form-control-lg" placeholder="Enter Your Name" name="name" value={name} onChange={(e) => onInputChange(e)} />
          </div>
          <div className="form-group">
            <input type="text" className="form-control form-control-lg" placeholder="Enter Your Password" name="password" value={password} onChange={(e) => onInputChange(e)} />
          </div>
          <div className="form-group">
            <input type="email" className="form-control form-control-lg" placeholder="Enter Your E-mail Address" name="email" value={email} onChange={(e) => onInputChange(e)} />
          </div>
          <button className="btn btn-primary btn-block" onClick={(e) => addUser(e)}>
            Add User
          </button>
        </form>
      </div>
    </div>
  );
};
export default AddUser;
Finally, let’s add the updateUser mutation.
const UPDATE_USER = gql`
  mutation updateUser($id: ID!, $name: String!, $password: String!, $email: String!) {
    updateUser(id: $id, name: $name, password: $password, email: $email) {
      _id
      name
      password
      email
    }
  }
`;
export { DELETE_USER, CREATE_USER, UPDATE_USER };
After adding all mutations, this is what our userMutations.js looks like:
import { gql } from "@apollo/client";
const DELETE_USER = gql`
  mutation deleteUser($id: ID!) {
    deleteUser(id: $id)
  }
`;
const CREATE_USER = gql`
  mutation createUser($name: String!, $password: String!, $email: String!) {
    createUser(name: $name, password: $password, email: $email) {
      _id
      name
      password
      email
    }
  }
`;
const UPDATE_USER = gql`
  mutation updateUser($id: ID!, $name: String!, $password: String!, $email: String!) {
    updateUser(id: $id, name: $name, password: $password, email: $email) {
      _id
      name
      password
      email
    }
  }
`;
export { DELETE_USER, CREATE_USER, UPDATE_USER };
In our src/components/users/EditUser.js file add the following code:
import { useMutation } from "@apollo/client";
import { UPDATE_USER } from "../../mutations/userMutations";
const EditUser = () => {
  const [updateUser] = useMutation(UPDATE_USER);
  const updateExistingUser = (e) => {
    e.preventDefault();
    if (name.length && password.length && email.length) {
      updateUser({
        variables: {
          id,
          name,
          password,
          email,
        },
      });
      setUser({
        name: "",
        password: "",
        email: "",
      });
    }
  };

  return (
    <div className="container">
      <div className="w-75 mx-auto shadow p-5">
        <h2 className="text-center mb-4">Edit A User</h2>
        <form>
          <div className="form-group">
            <input type="text" className="form-control form-control-lg" placeholder="Enter Your Name" name="name" value={name} onChange={(e) => onInputChange(e)} />
          </div>
          <div className="form-group">
            <input type="text" className="form-control form-control-lg" placeholder="Enter Your Password" name="password" value={password} onChange={(e) => onInputChange(e)} />
          </div>
          <div className="form-group">
            <input type="email" className="form-control form-control-lg" placeholder="Enter Your E-mail Address" name="email" value={email} onChange={(e) => onInputChange(e)} />
          </div>
          <button className="btn btn-warning btn-block" onClick={(e) => updateExistingUser(e)}>
            Update User
          </button>
        </form>
      </div>
    </div>
  );
};
Our updated EditUser.js:
import React, { useState } from "react";
import { useParams } from "react-router-dom";
import { useMutation } from "@apollo/client";
import { UPDATE_USER } from "../../mutations/userMutations";
const EditUser = () => {
  const [updateUser] = useMutation(UPDATE_USER);
  const { id } = useParams();
  const [user, setUser] = useState({
    name: "",
    password: "",
    email: "",
    phone: "",
    website: "",
  });

  const { name, password, email } = user;

  const onInputChange = (e) => {
    setUser({ ...user, [e.target.name]: e.target.value });
  };

  const updateExistingUser = (e) => {
    e.preventDefault();
    if (name.length && password.length && email.length) {
      updateUser({
        variables: {
          id,
          name,
          password,
          email,
        },
      });
      setUser({
        name: "",
        password: "",
        email: "",
      });
    }
  };

  return (
    <div className="container">
      <div className="w-75 mx-auto shadow p-5">
        <h2 className="text-center mb-4">Edit A User</h2>
        <form>
          <div className="form-group">
            <input type="text" className="form-control form-control-lg" placeholder="Enter Your Name" name="name" value={name} onChange={(e) => onInputChange(e)} />
          </div>
          <div className="form-group">
            <input type="text" className="form-control form-control-lg" placeholder="Enter Your Password" name="password" value={password} onChange={(e) => onInputChange(e)} />
          </div>
          <div className="form-group">
            <input type="email" className="form-control form-control-lg" placeholder="Enter Your E-mail Address" name="email" value={email} onChange={(e) => onInputChange(e)} />
          </div>
          <button className="btn btn-warning btn-block" onClick={(e) => updateExistingUser(e)}>
            Update User
          </button>
        </form>
      </div>
    </div>
  );
};
export default EditUser;This article demonstrated how to build a User Management Tool using MongoDB, GraphQL + Express and React.
You can download the source code from this repository.