How we helped Justuno transition into a new era
Work
Amazon Web Services, or AWS, is the world’s most powerful and comprehensive computing cloud platform. It provides us with a set of tools and services to build just about anything.
In this series of articles, we’ll look at how you can use AWS Amplify to create a production-ready example of a Serverless React application with a simple API, as well as configure a custom domain, preview links, and notifications.
Before you can jump into this content, you’ll need a basic understanding of the following:
According to the official description on its website, AWS Amplify is a set of purpose-built tools and features that allow front-end web and mobile developers to quickly and easily build full-stack applications on AWS. In doing so, they have the flexibility to leverage the breadth of AWS services as their use cases evolve.
Simply put, it’s a set of utilities and JavaScript libraries that we can use to quickly build and deploy serverless applications.
A quick explanation about serverless: it’s not a serverless setup, but rather an approach where there’s minimal work on the server.
Scaffolding a new Next.js project is a quick and easy process.
We are going to use create-next-app to start our project and call it “bb-portal”.
npx create-next-app@latest bb-portal
# OR
yarn create next-app bb-portal
The above command will create a new, fully set up Next.js project in the directory we specified.
Next, enter the directory and run “yarn dev” to start the new project.
To perform this step, you need to sign up for AWS or log in to your existing account.
Amplify consists of CLI and Amplify libraries. CLI is a unified toolchain for building, integrating and managing AWS cloud services for your app.
First, let’s install CLI globally:
npm install -g @aws-amplify/cli
# OR
yarn global add @aws-amplify/cliThen we need to configure them with the following command:
amplify configureIf you haven’t already done so, Amplify will prompt you to log in to the AWS Console.

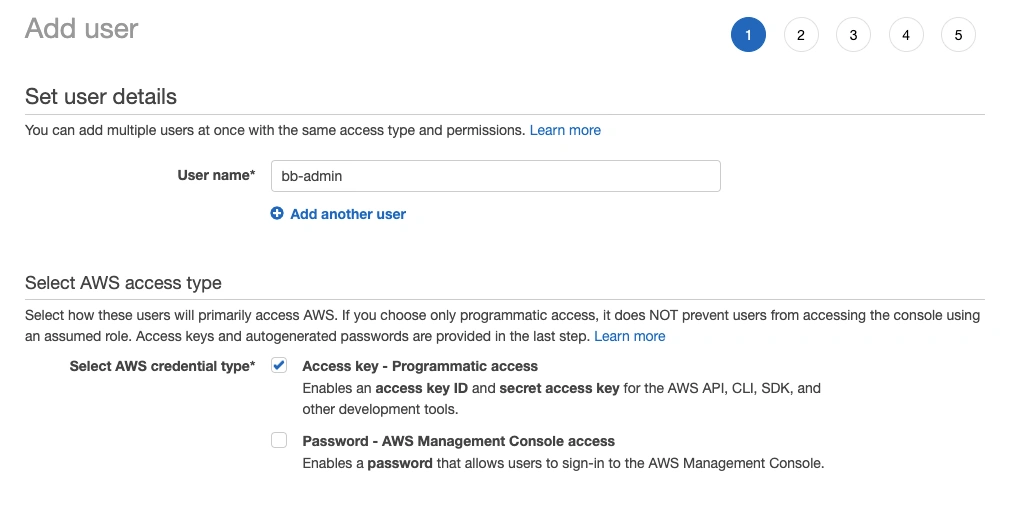
After logging in, you need to select a region and create an IAM user:

We’ll opt for the username bb-admin. If necessary, you can find more information about IAM here.
Create a user and add the AdministratorAccess-Amplify policy for this user.
After our user is created, we need to take accessKeyId and secretAccessKey from the success screen and add it to our CLI.
If you want to edit your user, create a new access key or change settings, you can do so here: Main Navigation → IAM → Users → Security Credentials.
NOTE: We need a secretAccessKey that you won’t be able to retrieve later, so save it!
After that, we enter the profile name, and voilà — Amplify is set up!

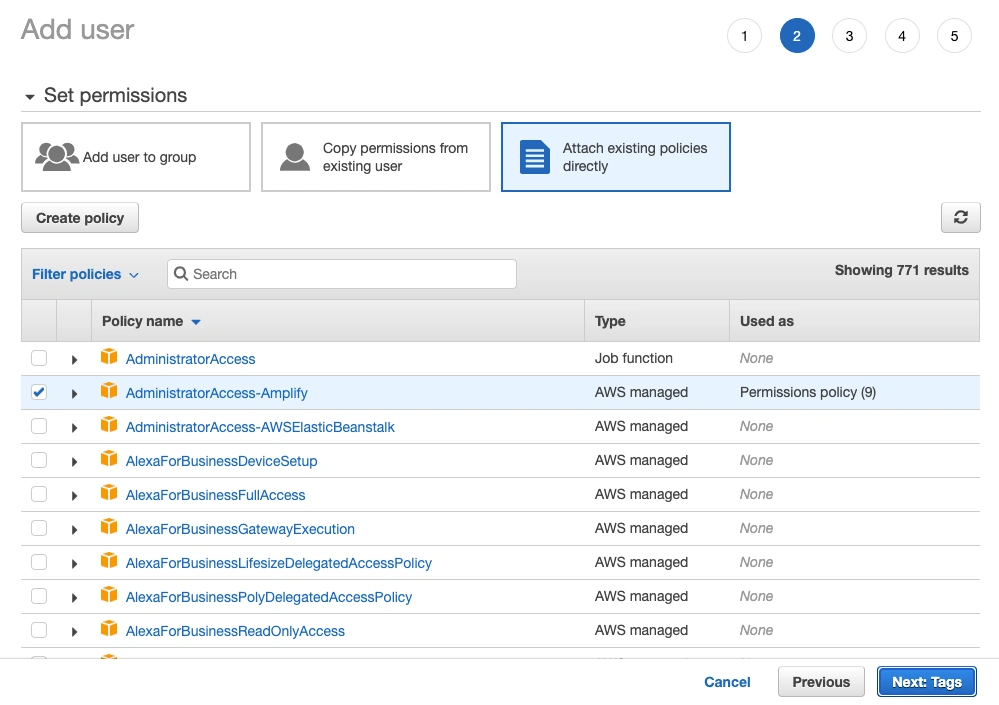
In our next step, we connect Amplify to our Next.js project. We do this with the init command:
amplify init
A few things happened while initializing Amplify:
In the next step, we add Amplify dependencies and we do this by running:
npm install aws-amplify @aws-amplify/ui-react
# OR
yarn add aws-amplify @aws-amplify/ui-react
aws-amplify is Amplify’s main library that we can use to interact with AWS services from our app, and @aws-amplify/ui-react provides us with a set of pre-made components for React that we can use to easily connect to the backend. We’ll come back to the packages, but for now, we’ll move on to GraphQL and the database setup.
To add the Cognito authentication service, we need to run the following command:
amplify add authAfter that, we need to answer a few configuration questions. In our case, we chose Username as the login method and skipped the advanced configuration.

Don’t forget to push the changes.
amplify pushIn order for us to host our code and access it via the URL, we first issue the command:
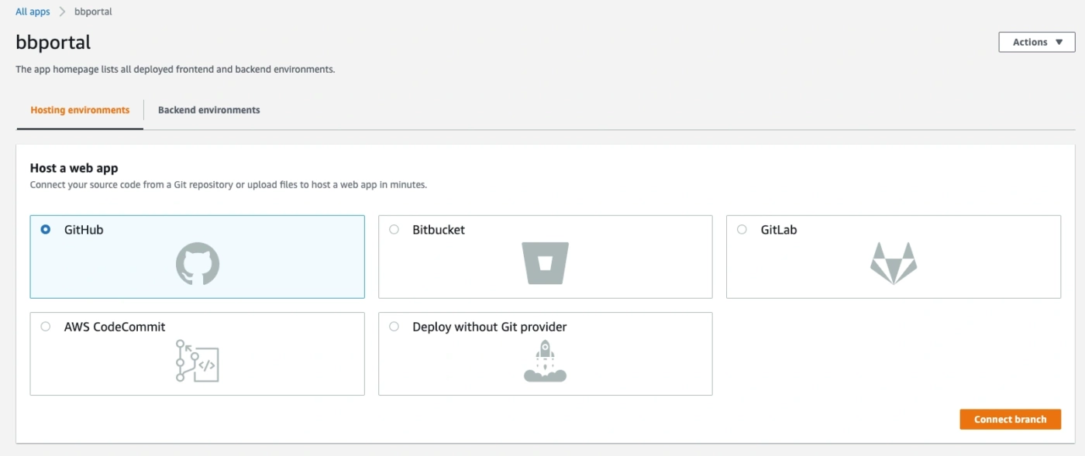
amplify add hostingWe’re presented with two questions where we select “Hosting with Amplify Console’, and “Git-based deployments”.

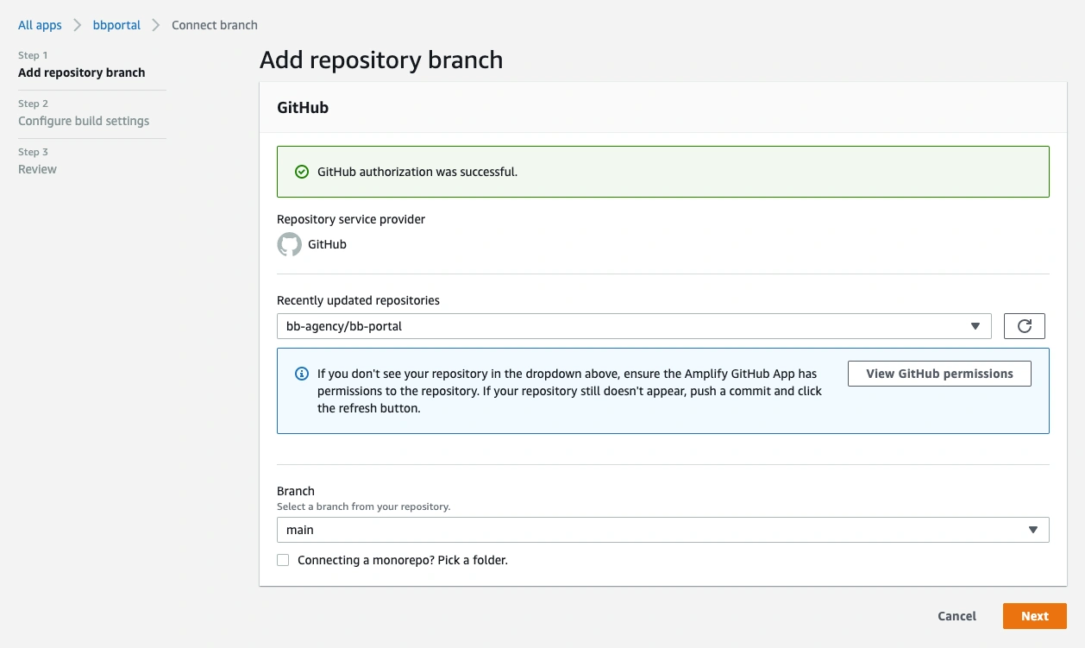
After that, we’re redirected to our AWS console window where we select our provider, in our case Github, and connect the repository.
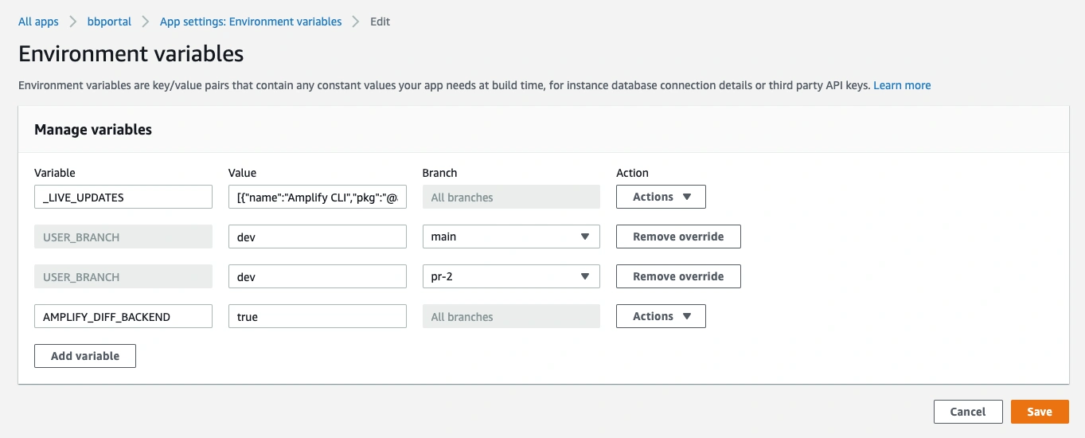
Reminder! With each amplify push command, we rebuild both the frontend and the backend. If we don’t want to do this, we can add the AMPLIFY_DIFF_BACKEND environment variable to our project. This will cause Amplify to run a diff check on our backend, and if nothing has changed, it won’t be rebuilt.
To do this, we go to Main Navigation → Amplify → bbportal → Environment variables. There we click on a Manage variables button and add our variable as seen in the image below. Save changes!
Amplify also provides us with a quick and easy way to add a data layer to our app. We can choose between REST and GraphQL API and this time we chose GraphQL. We add the API by pressing the next command:
amplify add apiQueries, mutations, and subscriptions are automatically created by Amplify in the root directory of our app. We will swap our index.js page content with the following.
pages/index.js –
import { useEffect, useState } from "react";
import { CheckboxField, withAuthenticator } from "@aws-amplify/ui-react";
import { createTodo, updateTodo } from "../mutations";
import { listTodos } from "../queries";
import { Amplify, API, graphqlOperation } from "aws-amplify";
import { Card, Flex, Button, Text, TextField } from "@aws-amplify/ui-react";
import awsExports from "../aws-exports";
import Image from "next/image";
/* initialise Amplify with our config */
Amplify.configure(awsExports);
function Home({ user }) {
  const [allTodos, setAlltodos] = useState(null);
  /* load todo data and set it into state variable  */
  useEffect(() => {
    (async () => {
      const todos = await API.graphql(graphqlOperation(listTodos));
      setAlltodos(todos.data.listTodos.items);
    })();
  }, []);
  const [name, setTodoName] = useState("");
  const changeTodoName = (e) => {
    setTodoName(e.target.value);
  };
  const submitAddTodo = async (e) => {
    e.preventDefault();
    if (name === "") return alert("Input field cannot be empty");
    const todo = { name, done: false };
    await API.graphql(graphqlOperation(createTodo, { input: todo }));
    allTodos === null ? setAlltodos([todo]) : setAlltodos([todo, ...allTodos]);
  };
  const toggleTodo = async (id) => {
    const todo = allTodos.find(({ id: _id }) => _id === id);
    let newTodo = { id, name: todo.name };
    newTodo.done = todo.done ? false : true;
    await API.graphql(graphqlOperation(updateTodo, { input: newTodo }));
  };
  return (
    <Flex direction="column" alignItems="center">
      <Image src="/logo.png" height={192} width={192} alt="BB Agency" />
      <Card variation="elevated">
        <form className="add-todo-form" onSubmit={submitAddTodo}>
          <Flex alignItems="flex-end">
            <TextField
              size="large"
              width="100%"
              placeholder="Add Todo"
              onChange={changeTodoName}
            />
            <Button type="submit" size="large" variation="primary">
              +
            </Button>
          </Flex>
        </form>
      </Card>
      {allTodos === null ? (
        <Text>Loading Todos...</Text>
      ) : allTodos?.length === 0 ? (
        <Text>No Todo available</Text>
      ) : (
        <div className="todos">
          {allTodos?.reverse().map(({ id, name, done }, i) => (
            <Flex key={i}>
              <CheckboxField
                onClick={() => toggleTodo(id)}
                id={id}
                value={id}
                key={i}
                defaultChecked={done}
                label={name}
                size="large"
              />
            </Flex>
          ))}
        </div>
      )}
    </Flex>
  );
}
export default withAuthenticator(Home);For this example, we’ve created a Notion template page that essentially serves as a Team Members data source that we will only use to display the data for now. In the next parts of the series, we’ll add a Lambda function to retrieve data and send it via mail and Slack on a daily basis, just like we did with the Simple Email Service setup.
We’ll fetch this data using the official Notion package/library “@notion-hq/client” and use v^1.0.1 of the package. We’ll additionally update this article to use a newer version, so please check back.
First, let’s hit:
yarn add @notionhq/[email protected] --exact
#OR
npm i @notionhq/[email protected]
We use the -exact flag to make sure that we install version 1.0.1 of the package.
Also, we’ll use the slugify package for the template page slugs.
yarn add slugify
#OR
npm i slugify
Then we create the lib folder in our app source directory and create the notion.js file in it.
lib/notion.js
import { Client } from "@notionhq/client";
// initialise notion Client with token applied
const notion = new Client({
  auth: process.env.NOTION_TOKEN,
});
// get the database/team members page data
export const getDatabase = async (databaseId, filter, start_cursor) => {
  const response = await notion.databases.query({
    database_id: databaseId,
    start_cursor,
    filter,
  });
  return response;
};
//get the page/single team member data
export const getPage = async (pageId) => {
  const response = await notion.pages.retrieve({ page_id: pageId });
  return response;
};
Next, we create the team folder in the pages folder and create two files in it.
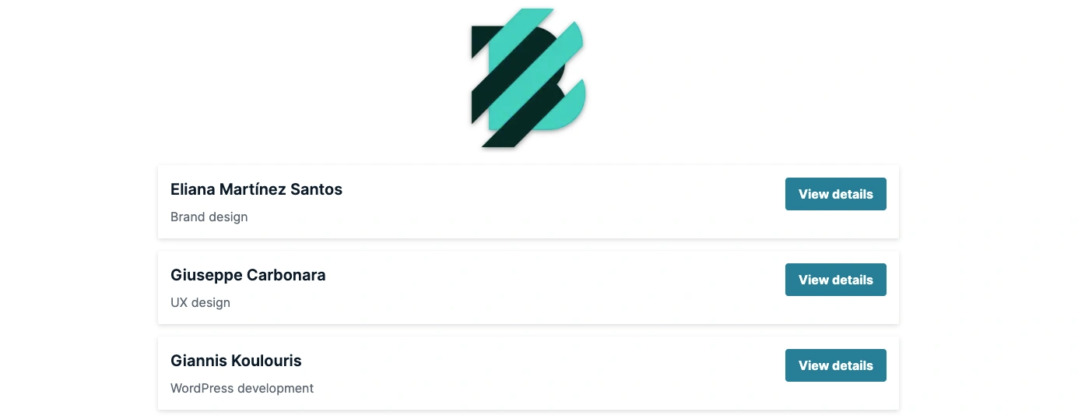
pages/team/index.js – we fetch the data with getServerSideProps() so we always have up-to-date data. Then we put the data in the useState variable and display it below. We also have a click handler that “slugifies” the team member’s name and navigates us to that route/URL.
import { useEffect, useState } from "react";
import { useRouter } from "next/router";
import slugify from "slugify";
import { Card, Flex, Button, Text } from "@aws-amplify/ui-react";
import { getDatabase } from "../../lib/notion";
import "@aws-amplify/ui-react/styles.css";
export const getServerSideProps = async () => {
  const peopleTableId = "6a8e707fb53d4ab59dac53f90cdbb918";
  const database = await getDatabase(peopleTableId);
  const people = database.results;
  return {
    props: {
      people,
    },
  };
};
export default function Reports({ people }) {
  const router = useRouter();
  const [data, setData] = useState([]);
  useEffect(() => {
    setData(people);
  }, [people]);
  const handleClick = (p) => {
    const href = `/team/${slugify(
      p?.properties?.Name?.title[0]?.plain_text.toLowerCase().replace("'", "")
    )}`;
    router.push(href);
  };
  return (
    <Flex direction="column" alignItems="center">
      {data?.map((p) => (
        <Card variation="elevated" key={p.id} width="50%" gap="20px">
          <Flex alignItems="flex-start" justifyContent="space-between">
            <Flex direction="column" gap="xs">
              <Text fontSize="large" fontWeight="semibold">
                {p?.properties?.Name?.title[0]?.plain_text}
              </Text>
              <Text color="font.tertiary">
                {
                  p?.properties["ORG Department"]?.rollup?.array[0]?.select
                    ?.name
                }
              </Text>
            </Flex>
            <Flex alignItems="center" justifyContent="center">
              <Button onClick={() => handleClick(p)} variation="primary">
                View details
              </Button>
            </Flex>
          </Flex>
        </Card>
      ))}
    </Flex>
  );
}
pages/team/[slug].js
import Head from "next/head";
import { useRouter } from "next/router";
import Image from "next/image";
import slugify from "slugify";
import { Card, Flex, Button } from "@aws-amplify/ui-react";
import { getDatabase } from "../../lib/notion";
/* render text if there is any */
export const Text = ({ text }) => {
if (!text) {
return null;
}
return text.map((value, i) => {
const {
annotations: { color },
text,
} = value;
return (
<h1 key={i} style={color !== "default" ? { color } : {}}>
{text.link ? <a href={text.link.url}>{text.content}</a> : text.content}
</h1>
);
});
};
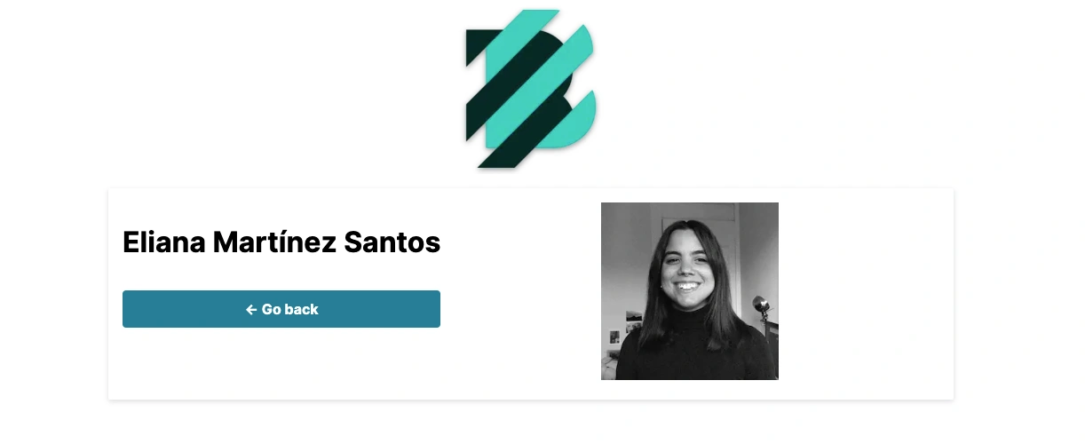
export default function Post({ page }) {
const router = useRouter();
if (!page) {
return <div />;
}
return (
<Flex direction="column" alignItems="center">
<Head>
<title>{page.properties.Name.title[0].plain_text}</title>
<link rel="icon" href="/favicon.ico" />
</Head>
<Card variation="elevated" width="50%" gap="20px">
<Flex alignItems="flex-start" justifyContent="space-between">
<Flex direction="column" gap="xs">
<Text text={page.properties.Name.title} />
<Button onClick={() => router.back()} variation="primary">
← Go back
</Button>
</Flex>
<div>
{page.cover.file.url && (
<Image
src={page.cover.file.url}
width={200}
height={200}
objectFit="cover"
alt="cover"
/>
)}
</div>
<section></section>
</Flex>
</Card>
</Flex>
);
}
/* get all paths/team members slugs and pre-render all the paths */
export const getStaticPaths = async () => {
const peopleTableId = "6a8e707fb53d4ab59dac53f90cdbb918";
const database = await getDatabase(peopleTableId);
return {
paths: database.results.map((page) => ({
params: {
slug: slugify(
page.properties.Name.title[0].plain_text
.toLowerCase()
.replace("'", "")
),
},
})),
fallback: true,
};
};
/* get specific page/team member, this is needed by getStaticProps */
export const getStaticProps = async (context) => {
const { slug } = context.params;
const peopleTableId = "6a8e707fb53d4ab59dac53f90cdbb918";
const database = await getDatabase(peopleTableId);
const page = database.results.find((result) => {
if (result.object === "page") {
const title = result.properties.Name.title[0].plain_text;
const resultSlug = slugify(title.replace("'", "")).toLowerCase();
return resultSlug === slug;
}
return false;
});
return {
props: {
page,
},
revalidate: 1,
};
};If needed, more info on data fetching methods that Next.js provides us can be found here.
Now, we run:
yarn dev
#OR
npm run dev
Now we can preview our team members’ index and detail page. Since we used getStaticProps/getStaticProps, the detail pages of our team members are created as a static page.
This is a quick one. We just need to grant Amplify privileges to be able to create an app in your GitHub account.
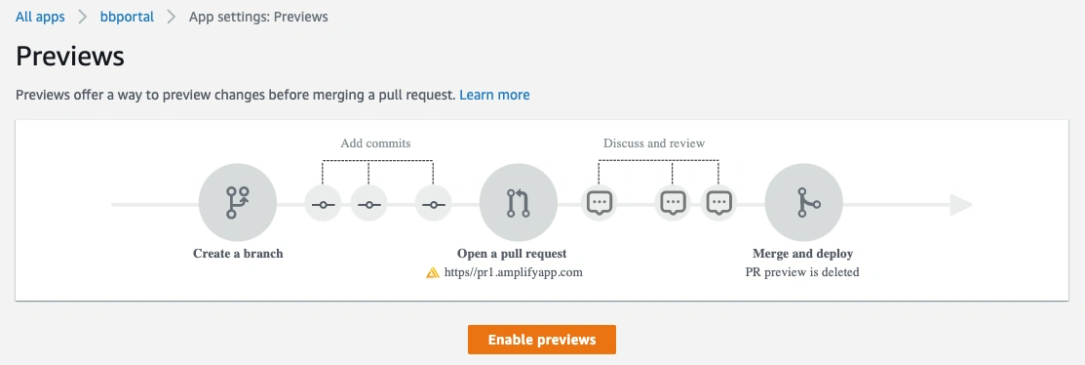
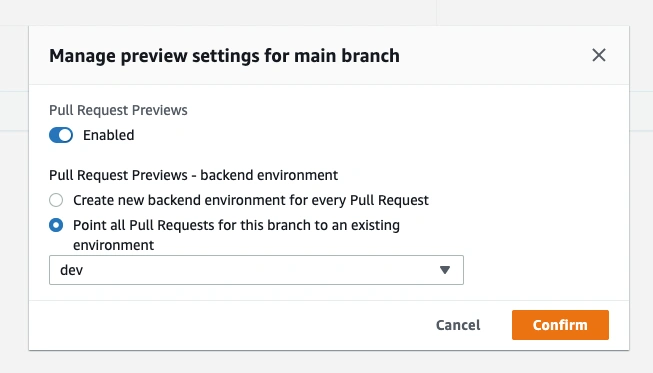
After we install the app on Github, the previews should already be set up. If the preview status is still disabled, we can select a provided branch and click the Manage button where we can change that.
We’re about to set up a custom domain, and in our case, we’ve chosen the registrar GoDaddy. First, we open our AWS console, and after selecting the project in the sidebar, under the App settings we go to Domain Management:

Next, we click the Add domain button. Under Domain, we enter the name of our root domain, bb-dev.website, and then click Configure domain. By default, Amplify creates two subdomain entries for our domain. Since we agree with the default configuration, we click Save.
In the next step, we need to update the DNS records that Amplify created for us with our provider/registrar. In our case, this is GoDaddy.

We won’t go into detail about setting up GoDaddy, but in short you need to add 2 CNAME records, one that points to our application and the second that points to the AWS Certificate Manager.
For more information/details, check out the links below:
Add a custom domain
Add a custom domain managed by GoDaddy
Next, we add email(s) so our stakeholders or developers know when a build succeeds or fails.
Again, we select Notifications in the sidebar under the selected project. On the notifications screen, we go to Add Notification, add an email address, and select a branch. Our added email account will receive a confirmation email that needs to be confirmed.
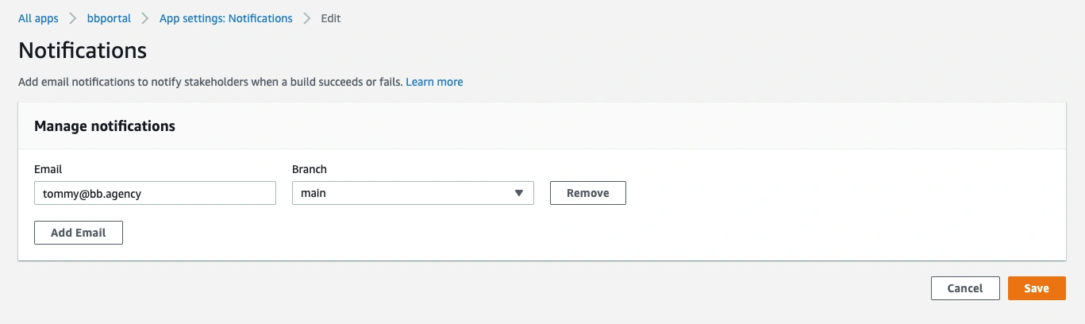
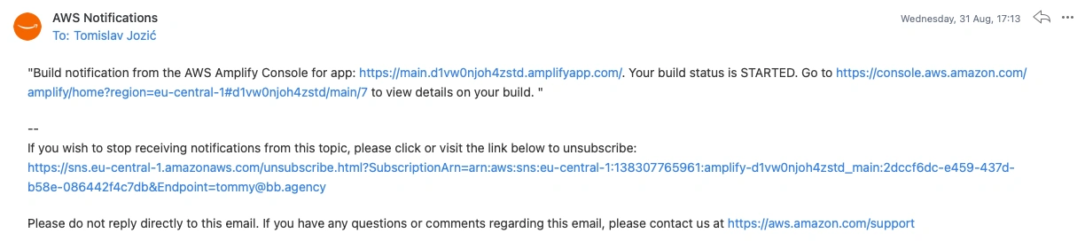
We click Save and voilà, we will be updated on build status changes. Below you can see an example of a notification email.
In this article, you learned how to build a serverless web app using AWS Amplify.
We did:
With integrated services like Cognito (authentication), DynamoDB, and AppSync (GraphQL), Amplify gives us a comprehensive environment. This can help you or your company build an application prototype or proof-of-concept in no time, using the latest and greatest technologies.